Documentation
PixelPhoto - The Ultimate Image Sharing & Photo Social Network Platform
PixelPhoto would like to welcome you to our official Knowledge Base. In our efforts to continually improve our product and assistance, we've established this new knowledge base and are filling it with user and developer documentation.
- Current Version: 1.6
- Author: DoughouzForest
- Created On: 24 July, 2018
- Last Update: 12 Jan, 2023
If you have any questions that are beyond the scope of this help file, Please feel free to email via Item Support Page.
Important! This is the only official PixelPhoto PHP Script, please stay away from any cracked, nulled or stolen copies, they may contain malwares.
With the official PixelPhoto license, you get life time free updates, support, and custom work services.
Installation
Follow the steps below to setup your site:
- Unzip the downloaded package and open the /Script folder to find all the script files. You will need to upload these files to your hosting web server using FTP or localhost in order to use it on your website.
- Below is the folder structure and needs to be uploaded to your website or localhost root directory:
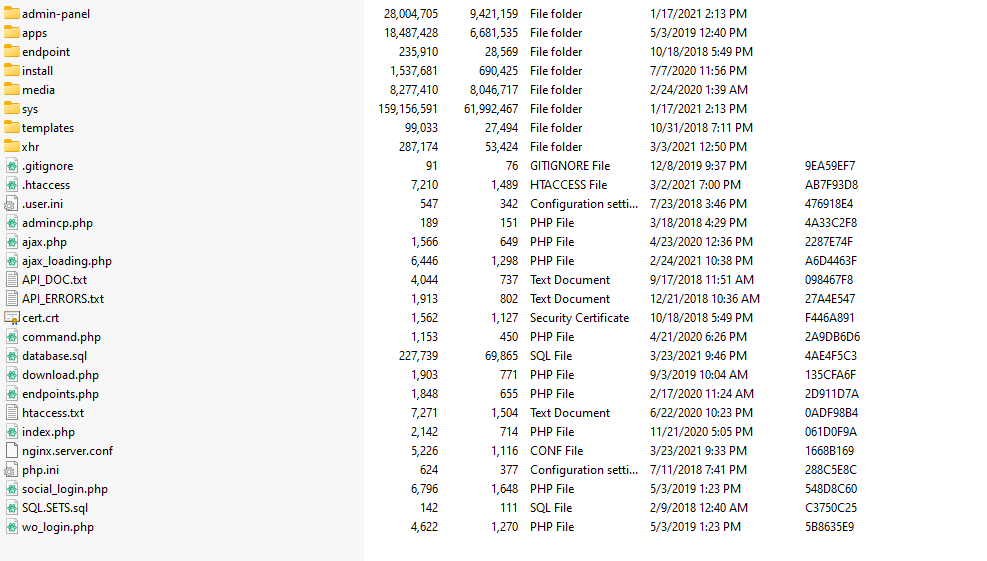
- You should upload all the files.
- Once you are done uploading, open your browser (Google Chrome is recommended).
- Go to http://www.YOUTSITE.com/install
- Agree the Terms of Use then click Next.
-
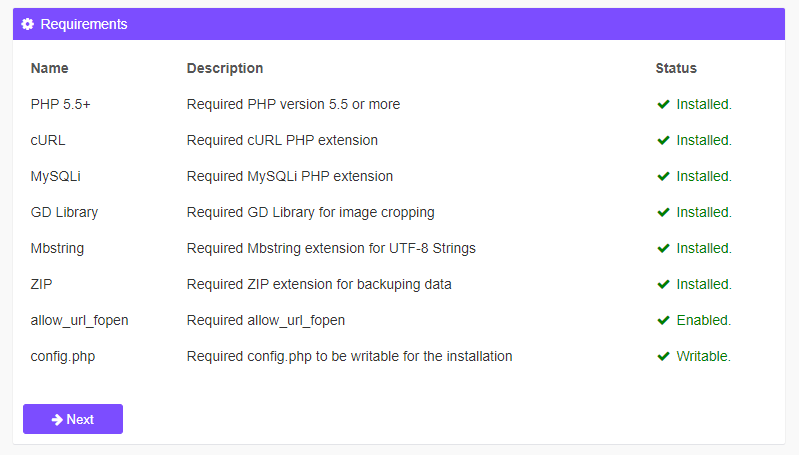
Important! Before we start the installation, please make sure you have the following installed on your server:
-
In the second page, make sure to fill the required data:
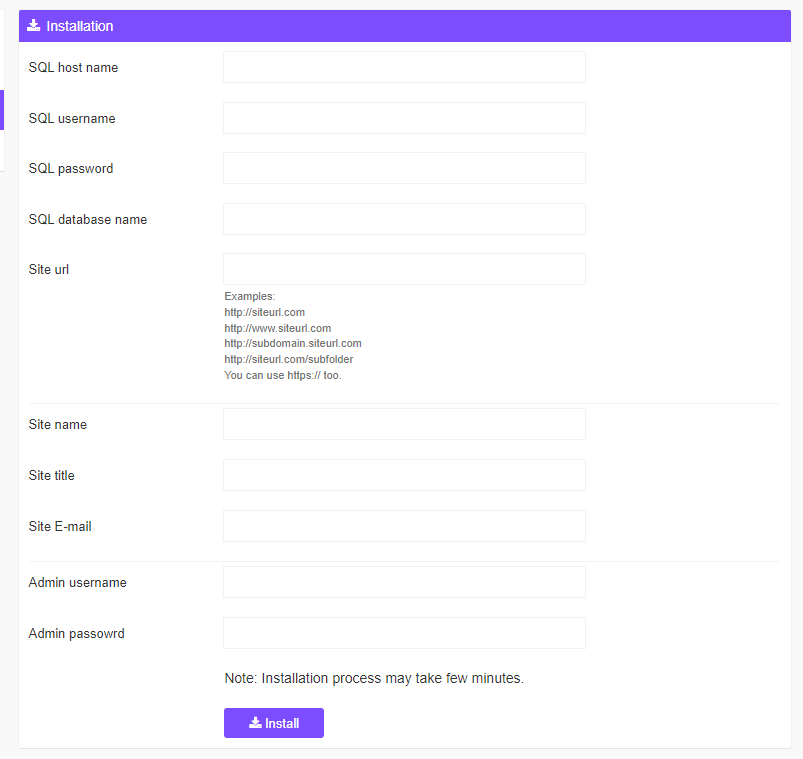
- Purchase Code - Envato purchase code. What is this?
- SQL Host name - MySQL host name, e.g: localhost
- SQL Username - MySQL username.
- SQL Password - MySQL user password.
- SQL Database - MySQL database name.
-
Site URL - Your Website URL, examples:
- https://siteurl.com
- https://www.siteurl.com
- https://siteurl.com
- https://subdomain.siteurl.com
- http://localhost
- https://siteurl.com/subfolder
- Site Name - Your site name, max 32 characters.
- Site Title - Your site title, max 100 characters.
- Site E-mail - Your site email, ex: info@yourdomain.com, Gmail or Hotmail is not supported. It should be one of your server's emails.
- Admin Password- Choose your admin password.
- Once you have wrote the information, please click the install button and wait for a while, the installation process may take up to 5 minutes.
- We are ready to go!
Hmm, using Nginx? if your server is using Nginx, please follow the last steps below:
- Open your server's root nginx.conf file, most of the time It's located it in: /etc/nginx/nginx.conf
- Open the home directory of the script, you should be able to find this file nginx.conf.
- Open the located file, and copy its content to your root nginx.conf file: /etc/nginx/nginx.conf
- If you find it something difficult to do, please contact your hosting provider, and they will do it for you easily.
What's Next?
Most Important Part After Installation is to redirect non www to www, or www to non www. Also it is important to setup SSL for your site, Please follow the steps below to do so.
- Open .htaccess file located in root directory.
-
To redirect your website to SSL, copy and paste the code below after RewriteEngine On
RewriteCond %{HTTPS} off RewriteRule (.*) https://%{HTTP_HOST}%{REQUEST_URI} [R,L] -
To redirect your website to www, copy and paste the code below after RewriteEngine On
RewriteCond %{HTTP_HOST} ^[^.]+\.[^.]+$ RewriteCond %{HTTPS}s ^on(s)| RewriteRule ^ http%1://www.%{HTTP_HOST}%{REQUEST_URI} [L,R=301] - If you made any changes above, last step is to update your domain name in
config.phpfile.
Color Schemes
You can change your Website's Color Scheme in an instant. You can edit from these locations:
-
./apps/default/main/static/css/style.master.css -
./apps/default/main/static/css/style.welcome.css
Logo & Favicon Settings
The Logo Can Be Changed From Admin Panel -> Design -> Change Site Design
General Setup
A setup guide on configuring 3rd party services.
How to setup SMTP?
- The first step of the process is to create an email account on your hosting package. This will be required for the SMTP configuration of your PixelPhoto website and it will also ensure that all emails from your website are successfully delivered to your users. You can create a new email account via cPanel.
- Once you have your email account created, you can proceed with the actual configuration of your PixelPhoto website. You need to access your website as administrator and go to SMTP settings from
Admin Panel -> Settings -> E-mail & SMS Setup -> E-mail Configuration -
Edit the following options:
- Server Type - Choose SMTP from the drop-down box
- SMTP Host -mail.example.com (change example.com to your actual domain)
- SMTP Username - Enter the email account created in the previous chapter
- SMTP Password - Enter the password for your email account
- SMTP Port - SMTP server port, most used 587 for TLS, and 465 for SSL encryption
- SMTP Encryption - Choose SMTP encryption method
-
I made the changes above but my website is not sending any emails, what I can do?
- Please test your SMTP credentials at SMTPER, if the same config worked by the test, please contact us.
How to setup FFMPEG?
- We have included a patched version of FFMPEG in the script, located in ./ffmpeg folder.
- Go to
Admin Panel -> File Upload Configuration -> FFMPEG Configuration - Enable FFMPEG, the default path for FFMPEG will be ./ffmpeg/ffmpeg
- Chmod and change file permission of ./ffmpeg/ffmpeg to 0777
- Now, find Debug FFMPEG, click debug and see the results.
- If the video file was converted after debugging, then everything is ready, you can ignore the below steps.
-
If you get broken video file, then you'll need to use your own server ffmpeg library, to install ffmpeg on your server, follow these links:
- How to install ffmpeg on Centos 7? Click Here.
- How to install ffmpeg on Centos 8? Click Here.
- How to install ffmpeg on Ubuntu? Click Here.
- How to install ffmpeg on debian? Click Here.
-
Once you done with the installation, go back to
Admin Panel -> File Upload Configuration -> FFMPEG Configuration& Edit the following options:- FFmpeg binary file path - Write the path you installed ffmpeg on your server, mostly will be
/usr/bin/ffmpegorffmpeg
- FFmpeg binary file path - Write the path you installed ffmpeg on your server, mostly will be
- Debug FFMPEG again, it should work fine.
- Important: Make sure shell_exec PHP function is enabled on your server.
- Try to upload videos to your website, if the video has been converted, then your site is ready!
How to setup OneSignal?
- Sign in to the Onesignal Console at https://onesignal.com/.
- Click on New App/Website
- Choose your app name and platform then click next.
- Fill the form with your website infromation, then click save.
- In next page, ignore the page and click on Finish.
- On top navbar, click on Keys & IDs
- Grab your OneSignal App ID & Rest API Key then go to
Admin Panel -> API Settings -> Push Notifications Settings -
Edit the following options for Android & IOS:
- OneSignal APP ID - Enter the OneSignal App ID you created in the previous chapter
- REST API Key - Enter the Rest API Key you created in the previous chapter
- Note: Every platform requires a new app, for example you need to create a separate app for Android, and another one for IOS.
How to get Google reCaptcha key?
- Sign in to the Google reCaptcha Admin at https://www.google.com/recaptcha/admin.
- On the top right corner, click on the plus + icon.
- Fill the required infromation ahd choose reCaptcha v2, once selected choose "I'm not a robot" Checkbox
- Add your domain name, then click submit.
- Click on Subscribe to Test
- Fill the information then add the API to your app we created above.
- Grab and copy SITE KEY .
- Grab and copy SITE SECRET .
-
Go to
Admin Panel -> Settings -> General Configuration -> Login & RegistrationEdit the following options:- Enable reCaptcha by clicking on the toggle.
- Recaptcha Key - Enter the site key you created in the previous chapter.
- Recaptcha Secret Key - Enter the secret site key you created in the previous chapter.
How to get YouTube API Key?
- Go to the Google API Manager console and log in using your Google credentials.
- After this click on Create Project link for create new project.
- Enter Project Name and click on Create button.
- Select the project from the dropdown menu beside Google Cloud Platform.
- Click on APIs & Services then click on +ENABLE APIS AND SERVICES .
- Search for YouTube Data API v3 and enable YouTube Data API v3.
- Once enabled, click on Credentials, on the top nav-bar, click on +Create credentials then click on API key
- Grab the key and Click Close.
-
Go to
Admin Panel -> Settings -> Website Information -> Features API Keys & Information, and edit the following options:- YouTube API Key - Enter the API key you created in the previous chapter.
How to get Google Maps Key?
- Go to the Google API Manager console and log in using your Google credentials.
- After this click on Create Project link for create new project.
- Enter Project Name and click on Create button.
- Select the project from the dropdown menu beside Google Cloud Platform.
- Click on APIs & Services then click on +ENABLE APIS AND SERVICES .
- Search for Maps Embed API and enable it.
- Search for Maps Static API and enable it.
- Once enabled, click on Credentials, on the top nav-bar, click on +Create credentials then click on API key
- Grab the key and Click Close.
-
Go to
Admin Panel -> Settings -> Website Information -> Features API Keys & Information, and edit the following options:- Google Map API - Enter the API key you created in the previous chapter.
How to get Giphy API key?
- Create a GIPHY API Key by clicking Create an App on the https://developers.giphy.com/dashboard/ (you need to create an account first).
- Choose SDK and click Next Step.
- Enter Your App Name, App Description and click on Create App button.
- Grab the API key.
-
Go to
Admin Panel -> Settings -> Website Information -> Features API Keys & Information, and edit the following options:- Giphy API - Enter the API key you created in the previous chapter.
How to setup Facebook social login plugin?
- Log in to your Facebook account.
- Go to Facebook for Developers, click on My Apps and press Create App.
- Select Consumer. and click Next.
- Set the Display Name of your application.
- Enter the Contact Email.
- Click on Create App.
- Navigate to Facebook Login and press the Set up button.
- Select Web from the displayed platforms.
- Go to the Settings on the left nav bar section and choose Basic.
-
In the appeared menu some of the fields are generated automatically. All you need to do is fill in the rest of them, such as App Domains, Contact Email, Privacy Policy URL, Terms Of Service in particular.
- App Domains - Enter your domain name, without http or https (example.com, www.example.com).
- Privacy Policy URL Enter your website's privacy policy URL (example.com/terms/privacy).
- Terms of Service URL Enter your website's Terms of Service URL (example.com/terms/terms).
- User Data Deletion Enter your website's Terms of Service URL (example.com/terms/terms).
- Category - Choose your app category.
- Click on Save changes.
- Go to the left nav bar section and choose Facebook Login then click on Settings .
- Scroll down a bit and find Valid OAuth Redirect URIs
-
Add the following Redirect URIs:
https://yourwebsite.com/social-login.php?provider=Facebookhttps://www.yourwebsite.com/social-login.php?provider=Facebook
- Click on Save changes
-
On the top you'll see this message Your app has Standard Access to public_profile. To use Facebook Login, switch public_profile to Advanced Access Click on Get Advanced Access
- Enter email in the search box, then click Get Advanced Access, confirm the form.
- Enter public_profile in the search box, then click Get Advanced Access, confirm the form.
-
Last step is to set the app mode to Live
- On the top navbar, you'll find App Mode, click the toggle and set the app to Live
- Complete Data Use Checkup (If required)
- Again, go to the Settings on the left nav bar section and choose Basic.
- Grab and copy App ID and App Secret.
-
Go to
Admin Panel -> Settings -> Social Login Settings -> Facebook Configuration& Edit the following options:- Application ID - Enter the App ID.
- Application Secret Key - Enter the App Secret.
- Enable Facebook Login.
This means, if you go to your website and then check the URL in the browser and the URL does look like http://www.domain.com then you need to enter the exact same URL. If your website URL is http://domain.com then you need to enter it that way, without using the www at the front of the name.
Use the same URL for the Valid OAuth Redirect URIs field.
If these entries do not completely match the URL of your website, the application won’t work and it will show an error message when you try to connect to the App.
How to setup Twitter social login plugin?
- Go to apps.twitter.com and click on Sign In in the top right. Log in using your personal Twitter credentials.
- Apply for API access: https://developer.twitter.com/en/apply-for-access, without this process you can't create any apps.
- If this is your first time creating an App on Twitter. You will see a button to Create an app
-
On the Create an application page, fill out all the information Twitter is asking for.
- App Name - Enter your website name.
- Application description - Enter your website description.
- Website URL - Enter your domain name, without http or https (example.com, www.example.com).
- Enable and click on Enable Sign with Twitter.
-
Callback URLs - Enter Redirect URIs, as following:
https://yourwebsite.com/social-login.php?provider=Twitterhttps://www.yourwebsite.com/social-login.php?provider=Twitter
- Privacy Policy URL - Enter your website's privacy policy URL (example.com/terms/privacy).
- Terms of Service URL - Enter your website's Terms of Service URL (example.com/terms/terms).
- Tell us how this app will be used - Fill the infromation.
-
After you successfully created the Twitter application you’ll be redirected to its Details Tab. click on the Permissions tab. In this tab you will find a Access option. please choose Read and Write from the list, scroll down and click on the Update Settings button to save your changes.
- Request email address from users option should be enabled for Social Login plugin.
- After you make sure, that the settings have been saved, go to the application’s API keys page by clicking on the Keys and Tokens tab.
- Grab and copy API key and API secret key.
-
Go to
Admin Panel -> Settings -> Social Login Settings -> Twitter Configuration& Edit the following options:- Consumer Key - Enter the API key.
- Consumer Secret - Enter the API secret key.
- Enable Twitter Login.
This means, if you go to your website and then check the URL in the browser and the URL does look like http://www.domain.com then you need to enter the exact same URL. If your website URL is http://domain.com then you need to enter it that way, without using the www at the front of the name.
Use the same URL for the Callback URL field.
If these entries do not completely match the URL of your website, the application won’t work and it will show an error message when you try to connect to the App.
How to setup Google+ social login plugin?
- Go to the Google API Manager console and log in using your Google credentials.
- After this click on Create Project link for create new project.
- Enter Project Name and click on Create button.
- Select the project from the dropdown menu beside Google CLoud Platform.
- Click on APIs & Services then click on +ENABLE APIS AND SERVICES .
- Search for Google+ and enable Google+ API.
- Once enabled, click on Credentials, on the top nav-bar, click on +Create credentials then click on Oauth client ID
-
In OAuth consent screen page, choose External, fill the form and click Save and Continue.
- In Authorized domains section, make sure to add your own domain name with or without www.
-
On the next page, you'll see the button Add or remove scopes, click on it.
- Look for auth/userinfo.email and select it.
- Look for auth/userinfo.profile and select it.
- Scroll down and click on UPDATE.
- If you successfully added the new scopes, click on SAVE AND CONTINUE.
- Ignore the Test users section and click on SAVE AND CONTINUE.
- Scroll down and click on BACK TO DASHBOARD.
- On the next page, click on PUBLISH APP and publish your application.
-
On the left nav bar, click on Credentials, on the top nav-bar, click on +Create credentials then Oauth client ID
- In Application type, choose web application.
-
In Authorized redirect URIs, add the following URIs:
https://yourwebsite.com/social-login.php?provider=Googlehttps://www.yourwebsite.com/social-login.php?provider=Google
- Click on Create then you'll see your Client ID and Client secret, copy those keys and headback to your website.
-
Go to
Admin Panel -> Settings -> Social Login Settings -> Google+ Configuration& Edit the following options:- Client ID - Enter the Client ID.
- Client secret - Enter the Client secret.
- Enable Google+ Login.
This means, if you go to your website and then check the URL in the browser and the URL does look like http://www.domain.com then you need to enter the exact same URL. If your website URL is http://domain.com then you need to enter it that way, without using the www at the front of the name.
Use the same URL for the Authorized redirect URIs field.
If these entries do not completely match the URL of your website, the application won’t work and it will show an error message when you try to connect to the App.
How to setup LinkedIn social login plugin?
- Go to the LinkedIn developer site: https://developer.linkedin.com/ .
- Click the Create App button on the banner.
-
To correctly create the application, please fill in the application sections, which are explained below.
- App Name - Enter a name for your application.
- LinkedIn Page - Select an existing company or choose a New Company. If you select the new company, you will be asked to enter a company name.
- Privacy policy URL - Enter your website's privacy policy URL (example.com/terms/privacy).
- App logo - Upload an icon for your application.
- Click on Create app.
- On the app page, scroll down, you'll find Additional settings, look for Domains and add your own domain name.
- On same page, scroll up and click on Auth.
-
In Authorized redirect URLs for your app, add the following URIs:
https://yourwebsite.com/social-login.php?provider=Linkedinhttps://www.yourwebsite.com/social-login.php?provider=Linkedin
- On the Auth page, you'll find Client ID and Client secret, copy those keys and headback to your website.
-
Go to
Admin Panel -> Settings -> Social Login Settings -> LinkedIn Configuration& Edit the following options:- Application ID - Enter the Client ID.
- Application Secret Key - Enter the Client secret.
- Enable LinkedIn Login.
This means, if you go to your website and then check the URL in the browser and the URL does look like http://www.domain.com then you need to enter the exact same URL. If your website URL is http://domain.com then you need to enter it that way, without using the www at the front of the name.
Use the same URL for the Authorized redirect URLs for your app field.
If these entries do not completely match the URL of your website, the application won’t work and it will show an error message when you try to connect to the App.
How to setup Vkontakte social login plugin?
- Go to the VK developers page: https://vk.com/apps
- Click on Create.
- On Platform, select Website, and add your own domain name.
-
To correctly create the application, please fill in the application sections, which are explained below.
- Title - Enter a name for your application.
- Description - Select an existing company or choose a New Company. If you select the new company, you will be asked to enter a company name.
- Terms and Conditions URL - Enter your website's privacy policy URL (example.com/terms/terms).
- Privacy policy URL - Enter your website's privacy policy URL (example.com/terms/privacy).
- App logo - Upload an icon for your application.
- Click on Save.
- On the left sidebar, click on Settings
-
In this page, look for Authorized redirect URI, add the following URIs:
https://yourwebsite.com/social-login.php?provider=Vkontaktehttps://www.yourwebsite.com/social-login.php?provider=Vkontakte
- In the same page, you'll find App ID and Secure key, copy those keys and headback to your website.
-
Go to
Admin Panel -> Settings -> Social Login Settings -> Vkontakte Configuration& Edit the following options:- Application ID - Enter the App ID.
- Application Secret Key - Enter the Secure key.
- Enable Vkontakte Login.
This means, if you go to your website and then check the URL in the browser and the URL does look like http://www.domain.com then you need to enter the exact same URL. If your website URL is http://domain.com then you need to enter it that way, without using the www at the front of the name.
Use the same URL for the Authorized redirect URI field.
If these entries do not completely match the URL of your website, the application won’t work and it will show an error message when you try to connect to the App.
How to setup Discord social login plugin?
- Visit Discord developer portal and sign in with your discord app developer account.
- On the page, Click on the New Application button and enter a Name for your app. Click on Save.
- Click on OAuth2 form left section.
-
Click on Add redirect and Enter Callback URL in that (Redirects), add the following URIs:
https://yourwebsite.com/social-login.php?provider=Discordhttps://www.yourwebsite.com/social-login.php?provider=Discord
- In the same page, you'll find Client Id and Client Secret, copy those keys and headback to your website.
-
Go to
Admin Panel -> Settings -> Social Login Settings -> Discord Configuration& Edit the following options:- Application ID - Enter the App ID.
- Application Secret Key - Enter the Secure key.
- Enable Discord Login.
This means, if you go to your website and then check the URL in the browser and the URL does look like http://www.domain.com then you need to enter the exact same URL. If your website URL is http://domain.com then you need to enter it that way, without using the www at the front of the name.
How to setup Mailru social login plugin?
- Go to https://o2.mail.ru/app and sign in with your Mail.ru app developer account.
- Go to Apps and click on Create an Application.
- Enter App name in Project name field.
-
Enter Redirect URI, add the following URIs:
https://yourwebsite.com/social-login.php?provider=Mailru
- Click on Connect Site
- On the same page you will get your Client ID and Client Secret under the Editing the Application section.
-
Go to
Admin Panel -> Settings -> Social Login Settings -> Mailru Configuration& Edit the following options:- Application ID - Enter the Client ID.
- Application Secret Key - Enter the Client secret.
- Enable Mailru Login.
This means, if you go to your website and then check the URL in the browser and the URL does look like http://www.domain.com then you need to enter the exact same URL. If your website URL is http://domain.com then you need to enter it that way, without using the www at the front of the name.
How to setup PixelPhoto social login plugin?
If you are using PixelPhoto script, you can integrate your site with PixelPhoto.
- Login into your website that is using PixelPhoto script as admin.
- Go to https://yourwebsite.com/create-app, replace yourwebsite.com with your own domain name.
-
To correctly create the application, please fill in the application sections, which are explained below.
- Name - Your application name. This is used to attribute the source user-facing authorization screens. 32 characters max.
- Domain - Enter your website URL (That is using PixelPhoto Script).
- Redirect URI -
https://yourwebsite.com/wo_login.php, replace yourwebsite.com with your own domain name (That is using PixelPhoto Script). - Description - Your application description, which will be shown in user-facing authorization screens. Between 10 and 200 characters max.
- Image - Upload an icon for your application.
- Click on Create.
- Get your App ID and App Secret.
-
Go to
Admin Panel -> Settings -> Social Login Settings -> PixelPhoto Configuration& Edit the following options:- API Key - Enter the App ID.
- API Secret - Enter the App Secret.
- PixelPhoto Domain - Enter your website URL (That is using PixelPhoto Script).
- PixelPhoto Icon - Enter your icon image URL (That is using PixelPhoto Script), example:
https://demo.wowonder.com/themes/default/img/icon.png - Enable PixelPhoto Login.
How to setup Instagram social login plugin?
Unfortunately, Instagram is not accepting any new applications anymore.
- Although not detailed in this configuration guide, you can create a new QQ app that enables users to log on to your web site by using their QQ account. To create a QQ developer account, you must complete a registration process that includes such tasks as providing a copy of your business license.
- If you already have a QQ developer account, you can create a social login app from the QQ developer’s site https://connect.qq.com
- Although not detailed in this configuration guide, you can create a new WeChat app that enables users to log on to your web site by using their WeChat account. To create a WeChat developer account, you must complete a lengthy application process that requires supplying information such as your personal ID and business license
- If you already have a WeChat developer account, you can create a social login app from the WeChat developer’s site https://open.wechat.com/
Payment Gateways Setup
PixelPhoto comes with a lot of payment gateways
Here is a setup guide on configuring payment gateways.
Stripe
- Go to Stripe & create a new account.
- Login to your dashboard & turn your account on by flipping the switch from “Test” to “Live”.
- Click Activate Account in the pop up window to fill out the standard business details Stripe needs to send you payments.
- Once you’ve completed the entire form, click Activate Account.
- Now that your account is live, go to Your Account and click on Account Settings.
- Click the API Keys tab & copy the Live Secret Key & Publishable Key.
-
Go to
Admin Panel -> Payments & Ads -> Payment Configuration, find Stripe and edit the following options:- Enable Stripe Payment Method by clicking on the toggle.
- Stripe API Secret Key - Your Stripe secret key that starts with sk_
- Stripe Publishable Key - Your Stripe publishable key that starts with pk_
PayPal
- Login to PayPal, then click here: https://developer.paypal.com/developer/applications/create
- Set your app name, email address then click Create App.
- On the top right side, you can see two tabs, SandBox and Live, Choose Live.
-
Go to
Admin Panel -> Payments & Ads -> Payment Configuration, find PayPal and edit the following options:- Enable PayPal Payment Method by clicking on the toggle.
- PayPal Mode - Choose Live (In case your app is in Live mode).
- PayPal Clinet ID - PayPal application ID you created in the previous chapter.
- PayPal Secret Key - PayPal application secret key you created in the previous chapter.
CashFree
- Go to Cashfree website & sign in to your account with a registered email address.
- Click on Activate button to activate various payment gateways for your account.
- Now, you can click on View Dashboard to view account details.
- Go to Credentials tab to access the test API credentials for payment gateways.
- Click on Get Credentials tab to access the sandbox credentials
- View app ID & secret key under Test Credentials tab.
-
Go to
Admin Panel -> Payments & Ads -> Payment Configuration, find CashFree and edit the following options:- Enable CashFree Payment Method by clicking on the toggle.
- CashFree Mode - Choose Live (In case your app is in Live mode).
- Client ID - CashFree application ID you created in the previous chapter.
- Client Secret - CashFree application secret key you created in the previous chapter.
RazorPay
- Go to the Razorpay website and Sign Up.
- Enter your work email address and a password for your Razorpay account and click Create Account.
- Fill Pre-sign Up Form
- Verify Email Address
- Once your account is created, you have access to the Test mode on the Dashboard. Test mode is used for testing purposes and does not involve actual money transactions. However, you would need to activate your account in order to accept live payments.
- To create an Application, follow this RazorPay Guide.
-
Once your application was created, take the required keys then go to
Admin Panel -> Payments & Ads -> Payment Configuration, find RazorPay and edit the following options:- Enable RazorPay Payment Method by clicking on the toggle.
- Application ID - CashFree application ID you created in the previous chapter.
- Application Secret - CashFree application secret key you created in the previous chapter.
PayStack
- Sign Up with Paystack
- Verify your sign up using a verification link sent to your email.
- The next thing is to sign in to your new Paystack account
- On your Dashboard you will find your public and secret key
-
Grab the keys, then go to
Admin Panel -> Payments & Ads -> Payment Configuration, find PayStack and edit the following options:- Enable PayStack Payment Method by clicking on the toggle.
- Secret Key - CashFree application secret key you created in the previous chapter.
PaySera
- Sign up with PaySera then Log in to your account. In the menu on the left choose Settings > Profile Settings > Service management > Change.
- Select Collection of payments online via e-banking and other systems and click on Order
- In the left menu please select Projects and Activities > My projects and click on Add a new project.
- In the opened window, enter data of a new project: In the section Service provider enter your online domain name.
- If you are not using any platform, select I will enter the project address manually and enter the website address.
- If you are using a platform, then in the section I will use a platform, a list of platforms will be provided and, after selecting one of them, the address used will be entered automatically.
- In the section Service description briefly describe the services you provide. If you are selling physical goods, enter the refund policy and delivery terms. More information on the description of the project is provided here.
- You can change the information and service description later as needed: Enter the current phone number and email address in the section Contact details. If required, also specify other contact details, e.g. Skype. These contact details will be provided to your buyers together with a payment confirmation letter. The project ownership confirmation code is provided in the section Project confirmation; you should paste it in your website’s head section. This way we will be sure that you are the real owner of the website. Having completed the requested information, click on Save project.
- Make sure that the website already contains purchase and sale, delivery and refund terms, privacy policy and your contact details as a merchant. Submit the project for review only when the website has been fully prepared to be used by clients, the payment platform has been integrated and test payments have been performed. Your submitted project will be reviewed within one day.
-
After creating a project, you will be provided with the data necessary for the technical integration of the payment platform
- In the menu on the left under Projects and Activities > My projects you will find the project ID (Project number/projectid);
- In the menu on the left under Projects and Activities > My projects click on Project settings > General project settings and you will find the code required to confirm ownership of your website;
- In the menu on the left under Projects and Activities > My projects click on Project settings > General project settings and you will find your project password.
-
Go to
Admin Panel -> Payments & Ads -> Payment Configuration, find PaySera and edit the following options:- Enable PaySera Payment Method by clicking on the toggle.
- PaySera Mode - Choose Live (In case your app is in Live mode).
- Project ID - PaySera project ID you created in the previous chapter.
- Account Password - Your PaySera project password.
Iyzipay
- Create an account in Iyzipay
- You can access the API and Security Key values, where you can test the services from the Settings menu, without the need for email activation
- Grab the keys then go to
Admin Panel -> Payments & Ads -> Payment Configurationpaste the keys in Iyzipay form and fill the rest of the infromation.
2Checkout
- Go to: https://secure.2checkout.com/cpanel/ and Sign in with your 2Checkout live account or create a new one.
- Now click on Integrations -> Webhooks & API and from API section, copy Merchant Code, Publishable Key and Private Key
-
Go to
Admin Panel -> Payments & Ads -> Payment Configuration, find 2checkout and edit the following options:- Enable 2checkout Payment Method by clicking on the toggle.
- 2checkout Mode - Choose Live (In case your app is in Live mode).
- Seller ID - Your Merchant ID.
- Publishable Key - Publishable Key you copied in the previous chapter.
- Private Key - Private Key you copied in the previous chapter.
Authorize.Net
- Log into the Merchant Interface.
- Click Account from the main toolbar.
- Click Settings in the main left-side menu.
- Click API Credentials & Keys.
Select New Transaction Key.
Note: When obtaining a new Transaction Key, you may choose to disable the old Transaction Key by clicking the box titled, Disable Old Transaction Key Immediately. You may want to do this if you suspect your previous Transaction Key is being used fraudulently.- Click Submit to continue.
- Request and enter PIN for verification.
- Your new Transaction Key is displayed.
- If the Disable Old Transaction Key Immediately box is not checked, the old Transaction Key will automatically expire in 24 hours. When the box is checked, the Transaction Key expires immediately.
-
Go to
Admin Panel -> Payments & Ads -> Payment Configuration, find Authorize.net and edit the following options:- Enable Authorize.net Payment Method by clicking on the toggle.
- Authorize.net Mode - Choose Live (In case your app is in Live mode).
- Authorize.Net API LOGIN ID - Your API Login ID.
- Authorize.Net TRANSACTION KEY - TRANSACTION KEY you copied in the previous chapter.
SecurionPay
- You can find a detailed doc here: https://securionpay.helpjuice.com/90032-backoffice/529474-api-keys
-
Once you got your keys, Go to
Admin Panel -> Payments & Ads -> Payment Configuration, find Securionpay and edit the following options:- Enable Securionpay Payment Method by clicking on the toggle.
- Securionpay Public key - Your Public key you copied in the previous chapter.
- Securionpay Secret key - Secret Key you copied in the previous chapter.
Yoomoney (Yandex)
- How to get your secret key: https://yookassa.ru/docs/support/merchant/payments/implement/keys?lang=en
-
Once you got your keys, Go to
Admin Panel -> Payments & Ads -> Payment Configuration, find Yoomoney and edit the following options:- Enable Yoomoney Payment Method by clicking on the toggle.
- Yoomoney Wallet ID - Your wallet ID.
- Secret key - Secret Key you copied in the previous chapter.
CoinBase
- Go to CoinBase commerce https://commerce.coinbase.com/, login or create account.
- Once you are logged in, go to https://commerce.coinbase.com/dashboard/settings
- Scroll down, find API keys then Click on Create an API key
- Click on Create API
- Grab the new API key
-
Once you got your key, Go to
Admin Panel -> Payments & Ads -> Payment Configuration, find CoinBase and edit the following options:- Enable CoinBase Payment Method by clicking on the toggle.
- API key - Your Public key you copied in the previous chapter.
CoinPayments
- Go to CoinPayments https://www.coinpayments.net/register, and create a new account.
- Once you are logged in, go to https://www.coinpayments.net/acct-api-keys
- Scroll down, and click Generate new key...
- Copy both Public Key and Private Key.
- Click on Edit Permissions and scroll down to API Key Permissions
- Enable the following: get_basic_info, set_basic_info, get_tx_info, create_transfer, get_conversion_info then click on Update Permissions
- Grab the new API keys
-
Once you got your keys, Go to
Admin Panel -> Payments & Ads -> Payment Configuration, find CoinPayments and edit the following options:- Enable CoinPayments Payment Method by clicking on the toggle.
- Merchant ID - Your account Merchant ID, you can get this ID from your account settings.
- Secret Key - Your Public key you copied in the previous chapter.
Storage Configuration
Here is a setup guide on configuring third party storages.
How to setup Amazon S3 Storage?
- Sign in to the AWS Management Console and open the Amazon S3 console at https://console.aws.amazon.com/s3/.
- Choose Create bucket.
- In Bucket name, enter a DNS-compliant name for your bucket.
- In Region, choose the AWS Region where you want the bucket to reside.
- Under Object Ownership, choose ACLs disabled.
- Choose Create bucket & You've created a bucket in Amazon S3.
-
Also make sure you added the Bucket Policy by adding this JSON code in Bucket Policy, You need to replace YOUR-BUCKET-NAME with your Bucket Name.
{ "Version": "2008-10-17", "Statement": [ { "Sid": "AllowPublicRead", "Effect": "Allow", "Principal": { "AWS": "*" }, "Action": "s3:GetObject", "Resource": "arn:aws:s3:::YOUR-BUCKET-NAME/*" } ] } -
Also make sure you have configered the CORS configuration by adding this JSON code below:
[ { "AllowedHeaders": [ "Authorization" ], "AllowedMethods": [ "GET" ], "AllowedOrigins": [ "*" ], "ExposeHeaders": [], "MaxAgeSeconds": 3000 } ] -
Next step is to get Security credentials.
- Open the IAM console at https://console.aws.amazon.com/iam/
- On the navigation menu, choose Users.
- Choose your IAM user name (not the check box).
- Open the Security credentials tab, and then choose Create access key.
-
To see the new access key, choose Show. Your credentials resemble the following:
- Access key ID:
AKIAIOSFODNN7EXAMPLE - Secret access key:
wJalrXUtnFEMI/K7MDENG/bPxRfiCYEXAMPLEKEY
- Access key ID:
- Go to
Admin Panel -> File Upload Configuration -> Amazon S3 Configuration -
Edit the following options:
- Amazon Bucket Name - Your new bucket we created on the previous chapter
- Amazon S3 Key - Your account access key ID
- Amazon S3 Secret Key - Your account secret access key
- Amazon S3 bucket Region - Your new bucket region we created on the previous chapter
- if your website is freshly installed and still brand new, you can ignore the upload process below and press only on Test Connection
-
Transferring files from PixelPhoto to Amazon S3:
- If you already have PixelPhoto installed on your server, and you want to use Amazon, make sure to upload the whole "upload/" folder to your bucket.
- We recommend to upload the folder and files via S3cmd.
- Make sure to use
--acl-publicin your command line while uploading the files.
How to setup Digitalocean Storage?
- Sign in to the DigitalOcean Console at https://cloud.digitalocean.com/.
- You can create a Space from the Create menu by selecting Spaces. This will take you to the Create a Space page.
- Choose a datacenter region.
- Choose to restrict file listing.
- Choose a unique name for your Space.
- After choosing your settings, click Create a Space. This will take you to the newly-created Space’s Files tab, which displays the files and folders in its root.
-
Next step is to get Security credentials.
- Click on API on the left nav-bar.
- Under Spaces access keys, Click on Generate New Key.
- Grab the Key & secret key.
- Go to
Admin Panel -> File Upload Configuration -> Digitalocean Configuration -
Edit the following options:
- Digitalocean Space Name - Your new bucket we created on the previous chapter
- Digitalocean Key - Your account access key
- Digitalocean Secret - Your account secret access key
- Digitalocean bucket region - Your new bucket region we created on the previous chapter
- if your website is freshly installed and still brand new, you can ignore the upload process below and press only on Test Connection
-
Transferring files from PixelPhoto to Digitalocean:
- If you already have PixelPhoto installed on your server, and you want to use Digitalocean, make sure to upload the whole "upload/" folder to your bucket.
- We recommend to upload the folder and files via S3cmd, Setting Up s3cmd 2.x with DigitalOcean Spaces
- Make sure to use
--acl-publicin your command line while uploading the files.
How to setup Google Cloud?
- Go to the Google API Manager console and log in using your Google credentials.
- After this click on Create Project link for create new project.
- Enter Project Name and click on Create button.
- Go to https://console.cloud.google.com/storage/browser.
- Click on Create Bucket, and fill the the form.
- At the top-left, click Menu > IAM & Admin > Service Accounts, Or go to https://console.cloud.google.com/iam-admin/serviceaccounts
- Click on Create service account, and fill the form.
- Click Keys > Add keys > Create new key.
- Select JSON, then click Create
- Your new public/private key pair is generated and downloaded to your machine as a new file. This file is the only copy of this key.
- Click Close
- Go to Google Cloud Settings from
Admin Panel -> File Upload Configuration -> Google Cloud Settings -
Edit the following options:
- Google Cloud Bucket Name - the bucket name you created.
- Google Cloud File - Choose the json file we just downloaded.
- Enable Google Cloud Storage
- if your website is freshly installed and still brand new, you can ignore the upload process below and press only on Test Connection
-
Transferring files from PixelPhoto to Cloud:
- If you already have PixelPhoto installed on your server, and you want to use Digitalocean, make sure to upload the whole "upload/" folder to your bucket.
How to setup FTP Storage?
- The first step of the process is to create an FTP account on your hosting package. This will be required for the FTP configuration of your PixelPhoto website and it will also ensure that all files from your website are successfully uploaded to your server. You can create a new FTP account via cPanel.
- Once you have your FTP account created, you can proceed with the actual configuration of your PixelPhoto website. You need to access your website as administrator and go to FTP settings from
Admin Panel -> File Upload Configuration -> FTP Settings -
Edit the following options:
- FTP Hostname - ftp.example.com (change example.com to your actual domain, or use your own domain name)
- FTP Username - Enter the FTP account you created in the previous chapter
- FTP Password - Enter the password for your FTP account
- FTP Port - Enter your FTP port number, default 21.
- FTP Path - Enter the path to /upload folder, default ./
- FTP Endpoint - (IP or domain where the FTP server is pointed to) example: storage.com, files will be surved from here.
- if your website is freshly installed and still brand new, you can ignore the upload process below and press only on Test Connection otherwise make sure to upload "upload/" folder to your FTP server.
How to setup Wasabi (FTP) Storage?
- Sign in to the Wasabi Console at https://wasabi.com/.
- Click On Create A bucket, and fill the required information, then create the bucket.
-
Enabling FTP/FTPS
- Click Settings on the Wasabi menu and open the FTP/FTPS drop-down.
- Slide the option to the right. The slide option is blue when FTP/FTPS is enabled. When FTP/FTPS is disabled, the option is gray
- A message indicates that FTP/FTPS does not comply with normal IAM policies, which could be a potential security risk.
- If you want to continue to enable FTP/FTPS, enter agree in the message area and then click TOGGLE.
- Note: The user name and password for FTP/FTPS usage is the same as the user name and password for the root account.
- Grab those info, then go to
Admin Panel -> File Upload Configuration -> FTP Settings -
Edit the following options:
- FTP Hostname - region.wasabisys.com (change region to your actual bucket region), Wasabi Region URLs
- FTP Username - Enter your Wasabi account username
- FTP Password - Enter your Wasabi account passsword
- FTP Port - 21.
- FTP Path - Enter the path to /upload folder, default ./
- FTP Endpoint - Your wasabi bucket Endpoint.
How to setup Wasabi (S3) Storage?
- Sign in to the Wasabi Console at https://wasabi.com/.
- Click On Create A bucket, and fill the required information, then create the bucket.
-
Getting the access keys:
- Go to https://console.wasabisys.com/#/access_keys
- Click on Create new access key
- A message indicates that your key was created, please download the file.
- Grab the access and secret keys from the downloaded file.
- Grab those info, then go to
Admin Panel -> File Upload Configuration -> Wasabi Configuration -
Edit the following options:
- Wasabi Bucket Name - Your new bucket we created on the previous chapter
- Wasabi Key - Your account access key
- Wasabi Secret - Your account secret access key
- Wasabi bucket region - Your new bucket region we created on the previous chapter
- if your website is freshly installed and still brand new, you can ignore the upload process below and press only on Test Connection
-
Transferring files from PixelPhoto to Wasabi:
- If you already have PixelPhoto installed on your server, and you want to use Wasabi, make sure to upload the whole "upload/" folder to your bucket.
- We recommend to upload the folder and files via S3cmd, Setting Up s3cmd 2.x with DigitalOcean Spaces
- Make sure to use
--acl-publicin your command line while uploading the files.
Video & Audio Chat
Here is a setup guide on configuring video and audio chat.
How to setup Twilio Video service?
- Log into your Twilio project at www.twilio.com/console. If you don't have account yet, create one.
- Click on https://console.twilio.com/us1/account/keys-credentials/api-keys.
- Click on Create API key and create the new key.
- Once done, you'll get SID, and Secret.
- Once copied the above keys, go to https://console.twilio.com/us1/account/manage-account/general-settings and copy Account SID
- Go to
Admin Panel -> Chat & Video/Audio -> Twilio API Configuration -
Edit the following options:
- Live accountSid - Your Account SID we got one previous chapter
- apiKeySid - Your API SID we got one previous chapter
- apiKeySecret - Your API Secret we got one previous chapter.
How to setup Agora (Video Chat) service?
- Sign up here to create an Agora account. After sign-up, you can log in here.
-
Once you finish the sign-up process, you can create an Agora project in Agora Console, To create an Agora project, do the following:
- Enter the Project Management page.
- Click Create.
- Follow the on-screen instructions to enter a project name and use case, and check Secured mode: APP ID + Token (Recommended) as the authentication mechanism.
- Click Submit. You can now see the project on the Project Management page.
- To copy the App ID, find your project on the Project Management page in Agora Console, and click the copy icon to the right of the App ID.
-
To get an App Certificate, do the following:
- On the Project Management page, click the edit icon for the project you want to use.
- Click the copy icon under Primary Certificate.
-
Generate a Customer ID and Customer Secret
- In Agora Console, click the account name in the top right corner, and click RESTful API from the drop-down list to enter the RESTful API page.
- Click Add a secret, and click OK. A set of Customer ID and Secret is generated.
- Click Download in the Customer Secret column. Read the pop-up window carefully, and save the downloaded
key_and_secret.txtfile in a secure location.
- Go to
Admin Panel -> Settings -> Chat & Video / Audio -> Agora API Configuration -
Edit the following options:
- App ID - Your APP ID we got one previous chapter
- App Certificate - Your App Certificate we got one previous chapter
- Customer ID - Enter the Customer ID you downloaded from key_and_secret.txt.
- Customer Secret - Enter the Customer ID you downloaded from key_and_secret.txt
Video Streaming
Here is a setup guide on configuring live streaming.
How to setup Agora (Live Streaming) service?
- Sign up here to create an Agora account. After sign-up, you can log in here.
-
Once you finish the sign-up process, you can create an Agora project in Agora Console, To create an Agora project, do the following:
- Enter the Project Management page.
- Click Create.
- Follow the on-screen instructions to enter a project name and use case, and check Secured mode: APP ID + Token (Recommended) as the authentication mechanism.
- Click Submit. You can now see the project on the Project Management page.
- To copy the App ID, find your project on the Project Management page in Agora Console, and click the copy icon to the right of the App ID.
-
To get an App Certificate, do the following:
- On the Project Management page, click the edit icon for the project you want to use.
- Click the copy icon under Primary Certificate.
-
Generate a Customer ID and Customer Secret
- In Agora Console, click the account name in the top right corner, and click RESTful API from the drop-down list to enter the RESTful API page.
- Click Add a secret, and click OK. A set of Customer ID and Secret is generated.
- Click Download in the Customer Secret column. Read the pop-up window carefully, and save the downloaded
key_and_secret.txtfile in a secure location.
- Go to
Admin Panel -> Settings -> Posts Settings -> Setup Live Streaming -> Agora API Configuration -
Edit the following options:
- App ID - Your APP ID we got one previous chapter
- App Certificate - Your App Certificate we got one previous chapter
- Customer ID - Enter the Customer ID you downloaded from key_and_secret.txt.
- Customer Secret - Enter the Customer ID you downloaded from key_and_secret.txt
How to setup Millicast service?
- Sign up https://dash.millicast.com/ to create an millicast account.
- Go to https://dash.millicast.com/#/tokens
- Click on the Plus Icon + to create a new token.
- Fill the required infromation, and click OK
- Once created, Click on the Settings Icon then select API
- Grab Account ID, and Publishing Token.
- Go to
Admin Panel -> Settings -> Posts Settings -> Setup Live Streaming -> Millicast API Configuration -
Edit the following options:
- Account ID - Account ID we got one previous chapter
- Publishing Token - Publishing Token we got one previous chapter
Monetization
General Information about PixelPhoto Monetization.
Advertising System
-
What is Advertising System?
-
Advertising System is a money earning feature, users can post ads in your website, with advertising system users can:
- Upload Image ads to website.
- Pay by CPC/CPM.
- Get paid from advertisers.
-
Advertising System is a money earning feature, users can post ads in your website, with advertising system users can:
-
How to turn on Advertising System?
- You can turn Advertising System On/Off from
Admin Panel -> Payment & Ads -> Advertisement System
- You can turn Advertising System On/Off from
-
How Advertising System Payment works?
- CPC, CPM, paid by user's wallet
-
What is CPC, CPM?
- CPC mean cost per click, how much will the system charge the user from every ad click?
- CPM mean cost per view, how much will the system charge the user from every ad view?
-
How much can I earn from this system?
- You can set the price you are willing to charge from advertisers from
Admin Panel -> Payment & Ads -> Advertisement System
- You can set the price you are willing to charge from advertisers from
Pro System
-
What is Pro System?
-
Pro System is a monthly subscription feature, with Pro system users can:
- Upload unlimited media files.
- Get Pro Badge.
- Boost posts in home page (featured posts).
- Boost pages in home page (featured pages).
- Get verification badge.
- See profile visitors.
- The ability to Show / Hide last seen.
-
Pro System is a monthly subscription feature, with Pro system users can:
-
How to turn on Pro System?
- You can turn Pro System On/Off from
Admin Panel -> Pro System -> Pro System Settings
- You can turn Pro System On/Off from
-
How Pro System Payment works?
- Monthly subscription, paid by user's wallet.
- You need to add ./expire_pro.php file to cronjob list.
Subscription System
-
What is Subscription System?
-
Subscription System is a monthly subscription feature, with Subscription users will:
- Pay you monthly to use your website.
- Earn money by new subscribers.
-
Subscription System is a monthly subscription feature, with Subscription users will:
-
How to turn on Subscription System?
- You can turn Subscription System On/Off from
Admin Panel -> Pro System -> Pro System Settings -> Pro Membership On Sign Up
- You can turn Subscription System On/Off from
-
How Subscription System Payment works?
- Monthly subscription, paid by user's wallet.
Self Hosted Ads
-
What is Self Hosted Ads?
-
Self Hosted Ads is a money earning feature, with Self Hosted Ads you can:
- Create free ads on entire website.
-
Self Hosted Ads is a money earning feature, with Self Hosted Ads you can:
-
How to turn on Self Hosted Ads?
- You can create HTML ads from
Admin Panel -> Payments & Ads -> Manage Site Advertisements
- You can create HTML ads from
MarketPlace (Buy / Sale)
-
What is MarketPlace?
-
MarketPlace is a money earning feature, with MarketPlace users can:
- Sell their own pictures.
- Buy pictures from other users.
-
MarketPlace is a money earning feature, with MarketPlace users can:
-
How to turn on MarketPlace?
- You can turn MarketPlace On/Off from
Admin Panel -> Manage Features -> Store -> Store Settings
- You can turn MarketPlace On/Off from
-
How MarketPlace Payment works?
- Per video sale, paid by user's wallet.
-
How much can I earn from this system?
- Your net earning will be (Commission Percentage * Product Price / 100) = Net Earnings, e.g: (2 * 12 / 100) = $0.24, so you'll get $0.24 from every new sale.
- You can change the commission percentage from
Admin Panel -> Manage Features -> Store -> Store Settings -> Sales Commission
PixelPhoto Features
General Information about PixelPhoto features.
Languages
-
How to add a new language?
- You can add new languages from
Admin Panel > Languages > Add New Language & Keys -> Add New Language.
- You can add new languages from
-
How to set the default website language?
- You can set the default language from
Admin Panel > Settings > General Configuration > Default Language.
- You can set the default language from
-
How to add a new language key?
- You can add new languages from
Admin Panel > Languages > Add New Language & Keys -> Add New Key.
- You can add new languages from
How To Update PixelPhoto?
A detailed documentation on how to update your website to a new update. Don't worry the update process is very easy!
- First of all, you have to download the latest version from your codecanyon Downloads page.
- Backup your website files & database using cPanel.
-
Once you have downloaded the script, you can find the update files in
./Update Guidefolder, as shown below: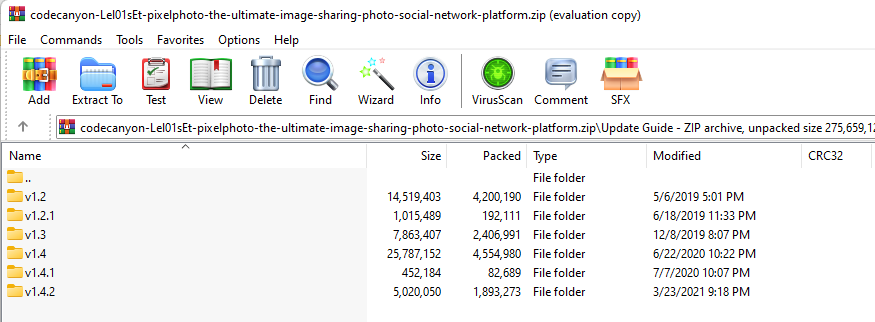
-
Choose the update version, and extract it to your Desktop.
Note: If you have missed an update or multiple updates, you have to update your site version by version manually. Please don't skip a version. -
The extracted files structure should look like this:

- Upload
./update.phpto your server using FTP client: /path/to/wowonder/update.php (Script root directory) -
Open the
./Script/folder, upload and overwrite ALL files/folders (SELECT ALL) file(s) located inside./Script/folder to your server, if you have renamed your theme, please open./Script/themes/wowonder/and upload & overwrite ALL files/folders to your theme folder as shown below: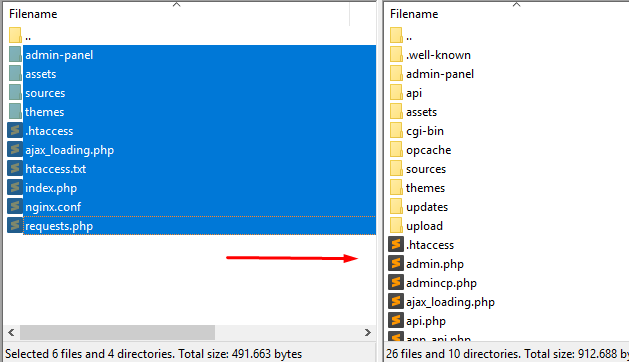
- Once the files are uploaded, open and run http://www.YOURSITE.COM/update.php (replace YOURSITE.com with your domain).
-
The update process may take up to 1 hour, once the update is done please go to Admin Panel and scroll down to verify the website has been updated as shown below:
Code Customization
We have included a Custom CSS/JS Files in the code so that you can better handle your Customizations for New Styles or Overwriting Default Theme Styles. Simply add all your Custom CSS/JS Codes in Admin Panel -> Design -> Custom Design
Where can I modify the HTML tamplates?
- You can find the layout files in
./apps/default/ - The files extention is .html
Where can I edit the stylesheet from?
- You can edit the stylesheet from
./apps/default/main/static/css/ - The general style file is: style.css
Where I can add my own code inside head/body/footer tags?
- You can do that from
./apps/default/main/tamplates/
How can I create new themes?
- Make a copy of ./apps/default folder, rename it.
- Go to you
Admin Panel -> Design -> Themes, and you'll find your theme there, under your theme name, click on activate.
Common Issues
We listed some common issue you should be aware of and know how to fix them.
Please make sure that the .htaccess file is uploaded to your server and updated to latest version.
If the file is exists, but you still face this issue, please contact your host provide, and let them enable mod_rewrite.
If you are using a VPS with Ubuntu Linux installed, please follow this guide.
If you use Nginx in your server, please follow the last step in the installation page.
FAQs
A FAQ is a list of frequently asked questions (FAQs).
Please note that our respond can take up to 2 business days.
- Availability to answer questions, Answering technical questions about item’s features, Assistance with reported bugs and issues, Help with included 3rd party assets.
- Any customization request will be ignored.
- Please make sure to read more about the support policy.
Support
If this documentation doesn't answer your questions, So, Please send us Email via Item Support Page
We are located in GMT +5:30 time zone and we answer all questions within 12-24 hours in weekdays. In some rare cases the waiting time can be to 48 hours. (except holiday seasons which might take longer).
Don’t forget to Rate PixelPhoto!
Go to your CodeCanyon Profile > Downloads Tab > & then You can Rate & Review for our script.
Thank You.
Changelog
See what's new added, changed, fixed, improved or updated in the latest versions.
v1.6 2022-01-12
- Added FFMPEG debugger.
- Added SMTP debugger.
- Added Flutterwave payment method.
- Added wasabi storage system.
- Added backblaze storage system.
- Added the ability to choose withdrawal method.
- Added developer mode to admin panel.
- Added the ability to set minimum withdrawal request.
- Added Yoomoney payment method.
- Added login with TikTok.
- Added the ability to create and generate sitemap.
- Added the ability to import reels from TikTok.
- Added Google Vision API to filter nude posts.
- Added two authentication system.
- Added CDN support.
- Added the support to translate terms of use pages.
- Added the ability to disable terms pages.
- Added 3 SMS providers.
- Added FFMPEG conversation speed settings.
- Added support for image/webp.
- Added more APIs.
- Updated All PHP libs.
- Fixed sharing posts with hashtags appear distorted on the main feed.
- Fixed the avatar on the profile page shows double url and cannot be displayed once remote storage like amazon s3 is turned on.
- Fixed If amazon s3 enabled gifs appear broken.
- Fixed showing broken social links in settings page.
- Fixed agora live and video calls.
- Fixed few issues in blog system.
- Fixed explore page showing old posts if there are boosted posts.
- Fixed if s3 is enabled, social login doesn't work.
- Fixed user can't resend
- Fixed can't change "Boosted Post" value from admin panel.
- Fixed contact us form not sending emails.
- Fixed only first Navigation works in "Manage Site Advertisements" in admin panel.
- Fixed copy and paste using right click doesn't work in admin panel.
- Fixed some files are loaded remotly, now all files are loaded from the same server.
- Fixed can't login to site again if maintenance mode is enabled + two auth.
- Fixed email validation system, user was getting empty string in email.
- Fixed files are not deleting from Digitalocean.
- Fixed coinpayments system.
- Fixed can't edit languages from admin panel.
- Fixed when user share a locked post, it shows unlocked on user's profile for everyone to see.
- Fixed Twilio calls.
- Fixed Business accounts not getting approved.
- Fixed If you enabled pro on sign up, all links will stop working using ajax load.
- Fixed 20+ minor bugs
- Improved speed.
v1.5 (2022-03-21)
- Added LinkedIn, Vkontakte, Instagram, QQ, WeChat, Discord & Mailru social login..
- Added more payment methods.
- Added Agora live & video chats.
- Added the ability to upload 360-degree video.
- Added the ability to unlock images and videos. (pay or subscribe)
- Added currency system.
- Added new admin panel, v2 .
- Added new welcome page design.
- Added submit button to comment box.
- Added audio chat.
- Added support for PHP 8.0+ and MySQL 8.0+
- Updated default theme design.
- Fixed 20+ reported bugs
- Improved speed.
v1.4.2 (2021-03-25)
- Added live system.
- Added more payment methods.
- Added reels section for videos.
- Fixed 20+ reported bugs
- Improved speed.
v1.4.1 (2020-07-08)
- Fixed few bugs
- Improved speed.
v1.4 (2020-06-22)
- Added more payment methods for example paysera, indian payment gateway and paystack.
- Added Ability to edit or delete photos from store.
- Added Add digital ocean for storage.
- Added ability to set and choose multi license types for store while uploading image and set price for each license type.
- Added ability to share posts within sites.
- Added video calls.
- Added ability to require subscription on sign up with (enable/disable).
- Added ability to limit storage for free users.
- Added allow signs ups from specific Email only for example users having gmail.com ID could sign up only.
- Added ability to post comments on blog.
- Added ability for users could also create blogs (enable/disable).
- Added ability to set light/dark mode by default
- Fixed bugs
- Improved speed.
v1.3 (2019-12-9)
- Added store system, users can sell images.
- Added blog system.
- Added new APIs.
- Fixed bugs
- Improved speed.
v1.2.1 (2019-07-10)
- Added earnigns page in admin panel.
- Fixed bugs
- Improved speed.
v1.2 (2019-05-07)
- Added like comment system.
- Added reply to comment system.
- Added affiliate system.
- Added more payment methods, bank transfer, stripe.
- Added the ability to pause the story if you click on it.
- Added To add money in the wallet from admin panel.
- Added Ads system for users, users now can advertise on your site.
- Added pro system, with new profile layout.
- Added raise money system, photographers can ask for funding and get funded by users.
- Added business account like Instagram.
- Added follow requests, now if profile is private, it is required to accept a follow request before viewing the posts.
- Removed @ from user profile url.
- Organized Admin panel, added search for some pages, select all for posts, etc.
- Updated Password hash system from sha1 to password_hash PHP function.
- Fixed few important bugs.
- Improved speed.
v1.1.2 (2019-01-13)
- Fixed few important bugs.
- Added New API for the new native app.
- Improved speed.
v1.1.1 (2018-11-21)
- Fixed few important bugs.
- Improved speed.
v1.1 (2018-10-29)
- Added face filters using webcam.
- Added watermark system on images
- Added support for mp4 links.
- Added night mode
- Added url fetcher, fetch images from urls.
- Added blacklist system, for ip, username, emails.
- Added lazyload for explore page (loads faster)
- Added activities system (likes, comments, follow)
- Added the abililty for the user to choose if their profile should be found/indexed.
- Added ReCaptcha check to forgot password form
- Added Session manager in settings page
- Added Contact us page
- Added emojis support for posts and comments.
- Added Playtube support, you can import videos from a site that uses playtube script.
- Added verification badge & system.
- Added report filtration/warnings system.
- Added startup page, upload avatar, fill info, follow.
- Added emebd system, users can emebd posts from PixelPhoto using iframe.
- Added video views system.
- Added ajax load for pages (now pages load without refreshing).
- Added full API system for the upcoming native app + docs.
- Fixed few important bugs.
- Improved speed.
v1.0.3 (2018-08-13)
- Fixed few important bugs.
v1.0.2 (2018-07-27)
- Fixed bugs in firefox and in video thumbnail.
v1.0.1 (2018-07-26)
- Fixed bugs.
v1.0
Initial release.
License
PixelPhoto is made by DoughouzForest under Envato Extended & Regular License.
What is the different between Extended and Regular license?
- An Extended License is required if the end user must pay to use the end product, means that you should own an extended license if you will charge your end users.
- Both versions are similar, same features, updates and support services.
- Both can be used one domain only, means you need a license for every domain.
More PHP Scripts
Checkout Our Below Premium PHP Scripts Made by DoughouzForest


Social Login Setup
PixelPhoto comes with a lot of social login plugins, your users can register to your website with one click!
Here is a setup guide on configuring social login.